

how to use the slice tool in photoshop
Using the Slice tools in Photoshop, you can carve images into smaller pieces that are easy to use on the Web. Adobe Certified Instructor Rafael Concepcion shows how to work with the Slice tools, optimizing your website's images to improve the site's performance.
Like this article? We recommend
I like to equate working with HTML to building a house. The HTML structure is the basic foundation and structure—wood, nails, windows. The images and content of a website are the stylistic touches that make each site unique, much like the furniture and decorative objects that distinguish a particular house.
It's important for you to understand Photoshop's role in designing a tailored experience for the Web. You'll use Photoshop to craft all of the graphics for your website. Think of it as designing and creating all of the furnishings that you'll put into your newly built house.
The problem with creating effective artwork for online use is the size of the image files. Beautiful graphics usually mean large files that require a lot of processing power and time to upload, download, and display. Most people are impatient online, expecting a website to load quickly; if it doesn't, one click in the browser takes the visitor elsewhere. How can you reconcile the visitor's desire for quick-loading pages with the huge files necessary to build an impressive-looking website? Photoshop provides the solution!
This article shows you how to use Photoshop tools to slice (break apart) your images into smaller files. When a visitor requests a page on your website, Photoshop's HTML code—created automatically as part of the slicing process—puts the small image files back together smoothly and invisibly to display your artwork in the browser with satisfactory speed.
Working with the Slice Tools
Figure 1 shows the Slice tools, which are located in the Crop tool group. With the Slice and Slice Select tools, you can turn an image in Photoshop into a series of smaller images united by HTML code. Drag the Slice tool over the image, and it will create a rectangular area indicating that a slice has been made. As you slice the image, you'll notice that other slices are created automatically (see Figure 2).

Figure 1 Press and hold down the tool in the Toolbar to display the other tools in that tool group.
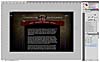
Figure 2 The sample website with one slice drawn on the header.
Images in HTML files from Photoshop need to be placed into a table. HTML tables were originally designed to show tabular data, but before long had become the standard way to align and position graphics on websites. Photoshop's ability to create automatic rows and columns with data makes it easier for designers to export graphics to the Web, eliminating guesswork. Just slice the graphics you need, and Photoshop will take care of the rest.
The slices that you create will automatically generate their own custom names based on presets. However, these slices won't add HTML functionality, such as <a></a> tags, unless you specify that information first.
The Slice Select tool (also located under the Crop tool) will let you highlight the individual slices of an image. To change the settings for the Slice Select tool, right-click the image and select Edit Slice Options (see Figure 3).
The Slice Options dialog allows you to specify how you want to name the individual slices, as well as a web address to which you want to link the sliced image (see Figure 4).
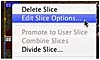
Figure 3 Right-clicking the slice brings up the Slice Options menu.
The Name field in the Slice Options dialog should definitely get your attention. Keep in mind that Photoshop will cut out all of these images and give them predetermined names. By using the slice options to provide specific names, you'll make it a lot easier to find the graphic files that you need when you set up the image later, using HTML in a text editor or using Dreamweaver CS5.
The most common problem you'll encounter when using the Slice tool is Photoshop's tendency to create too many slices. This is usually a result of the user making slices that don't conform to a tabled layout. In Figure 5, I've drawn a slice, but I didn't have the slice matching the border (as all of the other button slices on the left did), so Photoshop tried to help me by creating a lot of unnecessary slices.
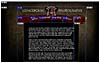
Figure 5 Our sample website with slices for a header and menu.
To fix a problem like this, use the Slice Select tool and click the slice. Once the slice is selected, drag the resize handles to align the errant slice with the other slices that you've made. You'll know that the slice is positioned correctly when the automatic slices disappear (see Figure 6).
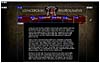
Figure 6 Snap one slice to another by dragging the selected slice to align it with the other slice.
how to use the slice tool in photoshop
Source: https://www.peachpit.com/articles/article.aspx?p=1659706
Posted by: riddlejoincte.blogspot.com
0 Response to "how to use the slice tool in photoshop"
Post a Comment